Getting your print files ready is a crucial step that can make or break your project. Many designers and small business owners face delays, extra costs, or unsatisfactory results because of simple mistakes in their print files. Avoiding these common errors ensures a smooth print process and a professional final product. Let’s look at the most frequent print file mistakes and how you can prevent them from costing you time and money.
Understanding and avoiding common print file mistakes like missing bleed, incorrect colors, and low resolution can save you from costly reprints and delays. Use checklists, proper settings, and careful proofing to ensure your files are print-ready every time.
Understanding The Impact Of Print File Mistakes
Print files might seem straightforward, but small errors can lead to big problems. These mistakes often cause delays, extra costs, or poor-quality prints that reflect badly on your brand or project. The best way to prevent these issues is by knowing what to look out for and adopting best practices early. Below, we’ll discuss the most common print file mistakes and practical ways to avoid them.
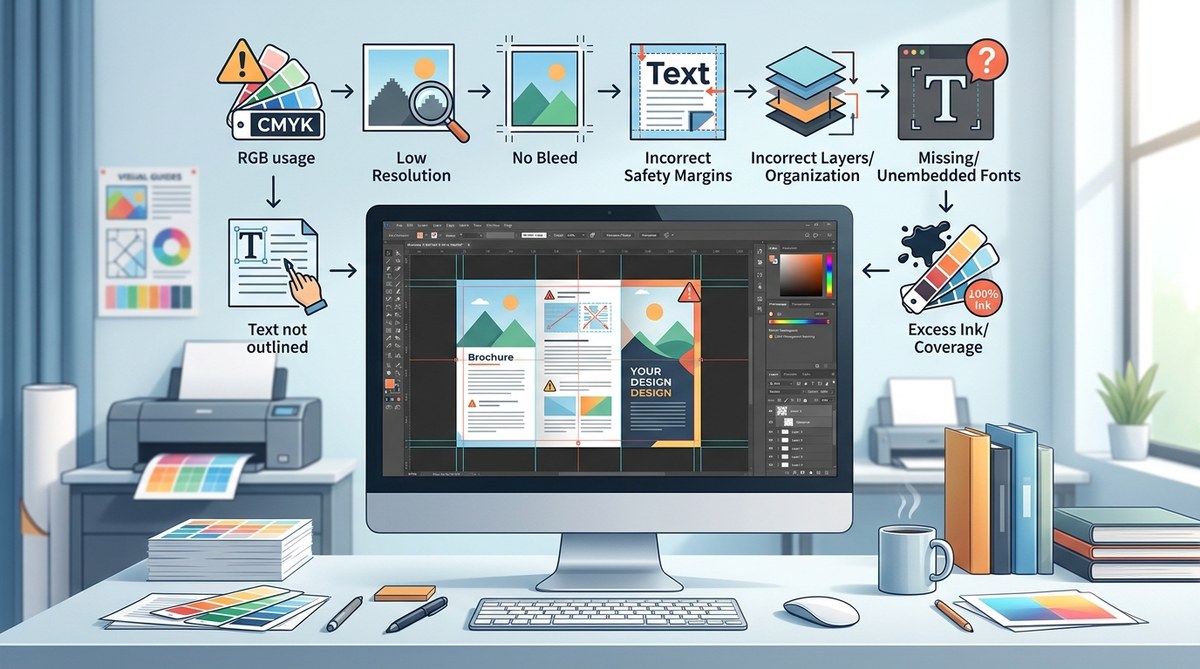
8 Common print file mistakes and how to prevent them
1. Forgetting to include bleed areas
One of the most frequent errors is omitting bleed. Bleed allows your design to extend beyond the trim line, avoiding unwanted white edges. If you forget to include bleed, your final product might have awkward white borders or uneven edges.
How to avoid: Always set your document with at least 3 mm (0.125 inches) of bleed on all sides. When exporting, ensure the bleed area is included, and your design extends into this zone.
2. Text and graphics are outside the safety margin
Design elements too close to the trim line risk being cut off. Keeping important text and graphics within a safe zone prevents them from being trimmed away.
How to avoid: Use guides to mark a safety margin of about 3 mm inside the trim line. Keep all critical information well within this zone.
3. Incorrectly positioned borders and lines
Borders that touch or cross the trim line can look unprofessional if they get cut unevenly. Also, borders too close to the edge might be trimmed off.
How to avoid: Place borders and lines at least 3 mm inside the safety margin. Consider using inner margins to keep everything balanced.
4. Artboard size doesn’t match the final print size
Designing on a different artboard than the actual print size causes scaling issues or misaligned elements. Confirm your document size matches the final product dimensions.
How to avoid: Double-check your document settings before starting. Use exact measurements for business cards, flyers, or posters.
5. Leaving print guide layers in the file
Many designers forget to hide or delete guide layers before exporting. These can accidentally appear in the final print or cause confusion.
How to avoid: Always hide or delete guide layers before exporting your file. Save a copy without guides for printing.
6. Colors are in RGB instead of CMYK
Colors in RGB mode may look vibrant on screen but can produce dull or inaccurate colors when printed. Converting to CMYK ensures colors match the print output.
How to avoid: Switch your document to CMYK mode before finalizing. Use color swatches for consistency and proof your colors with test prints.
7. Resolution is too low
Low-resolution images or graphics result in pixelated or blurry prints. For print, images should generally be at 300 DPI (dots per inch).
How to avoid: Check the resolution of all images. Avoid using images below 300 DPI. Replace low-res images with high-quality versions.
8. Fonts aren’t embedded or outlined
If fonts aren’t embedded in PDFs or converted to outlines, they might substitute or cause errors during printing.
How to avoid: Always embed fonts when exporting PDFs. Alternatively, convert text to outlines to prevent font issues.
Practical tips to keep your print files perfect
- Use a comprehensive pre-flight checklist before sending files.
- Export files in PDF/X-1a or PDF/X-4 formats for compatibility.
- Always proof your files on-screen and with a test print.
- Communicate with your printer about specific requirements.
- Keep layered files editable for future edits but export flattened versions for printing.
Techniques and mistakes comparison table
| Technique | Common mistake | Why it matters |
|---|---|---|
| Including bleed in design files | Forgetting bleed areas | Prevents unwanted white borders in final print |
| Using safety margins | Placing critical content too close to cut line | Avoids trimming off important info |
| Working in CMYK color mode | Using RGB colors | Ensures color accuracy in print |
| Setting images at 300 DPI | Using low-res images | Keeps prints sharp and professional |
| Embedding fonts or outlining text | Leaving fonts unembedded or unoutlined | Prevents font substitution errors |
“Always communicate with your printer before finalizing your files. They can provide specific guidelines to ensure your print runs smoothly.” — Print expert advice
Final thoughts on mastering print file preparation
Taking the time to understand and prevent common print file mistakes can save you hours of rework and unexpected costs. Develop a habit of checking your files against a detailed checklist, and always review your designs in the context of the final product. When in doubt, ask your printer for their preferred file specifications. Applying these practices will help you deliver professional, error-free print-ready files consistently.
Keeping your print projects smooth and stress-free
Print files don’t have to be intimidating. With a clear understanding of what causes mistakes and how to avoid them, you can confidently prepare files that meet printing standards. Remember, attention to detail pays off. Use templates, checklists, and communication as your tools. Your future self will thank you when your prints come out perfect the first time.